


ECM Classika II PID - In Depth Review
*Commissioned Review*
My daily espresso machine is a Rocket Giotto PID. I am a huge fan of PID machines as they use a digital probe to monitor the boiler temperature instead of a pressurestat. Seeing more and more companies coming out with a more economical PID machines is exciting. The ECM Classika II PID is a nicely priced more introductory prosumer espresso machine.

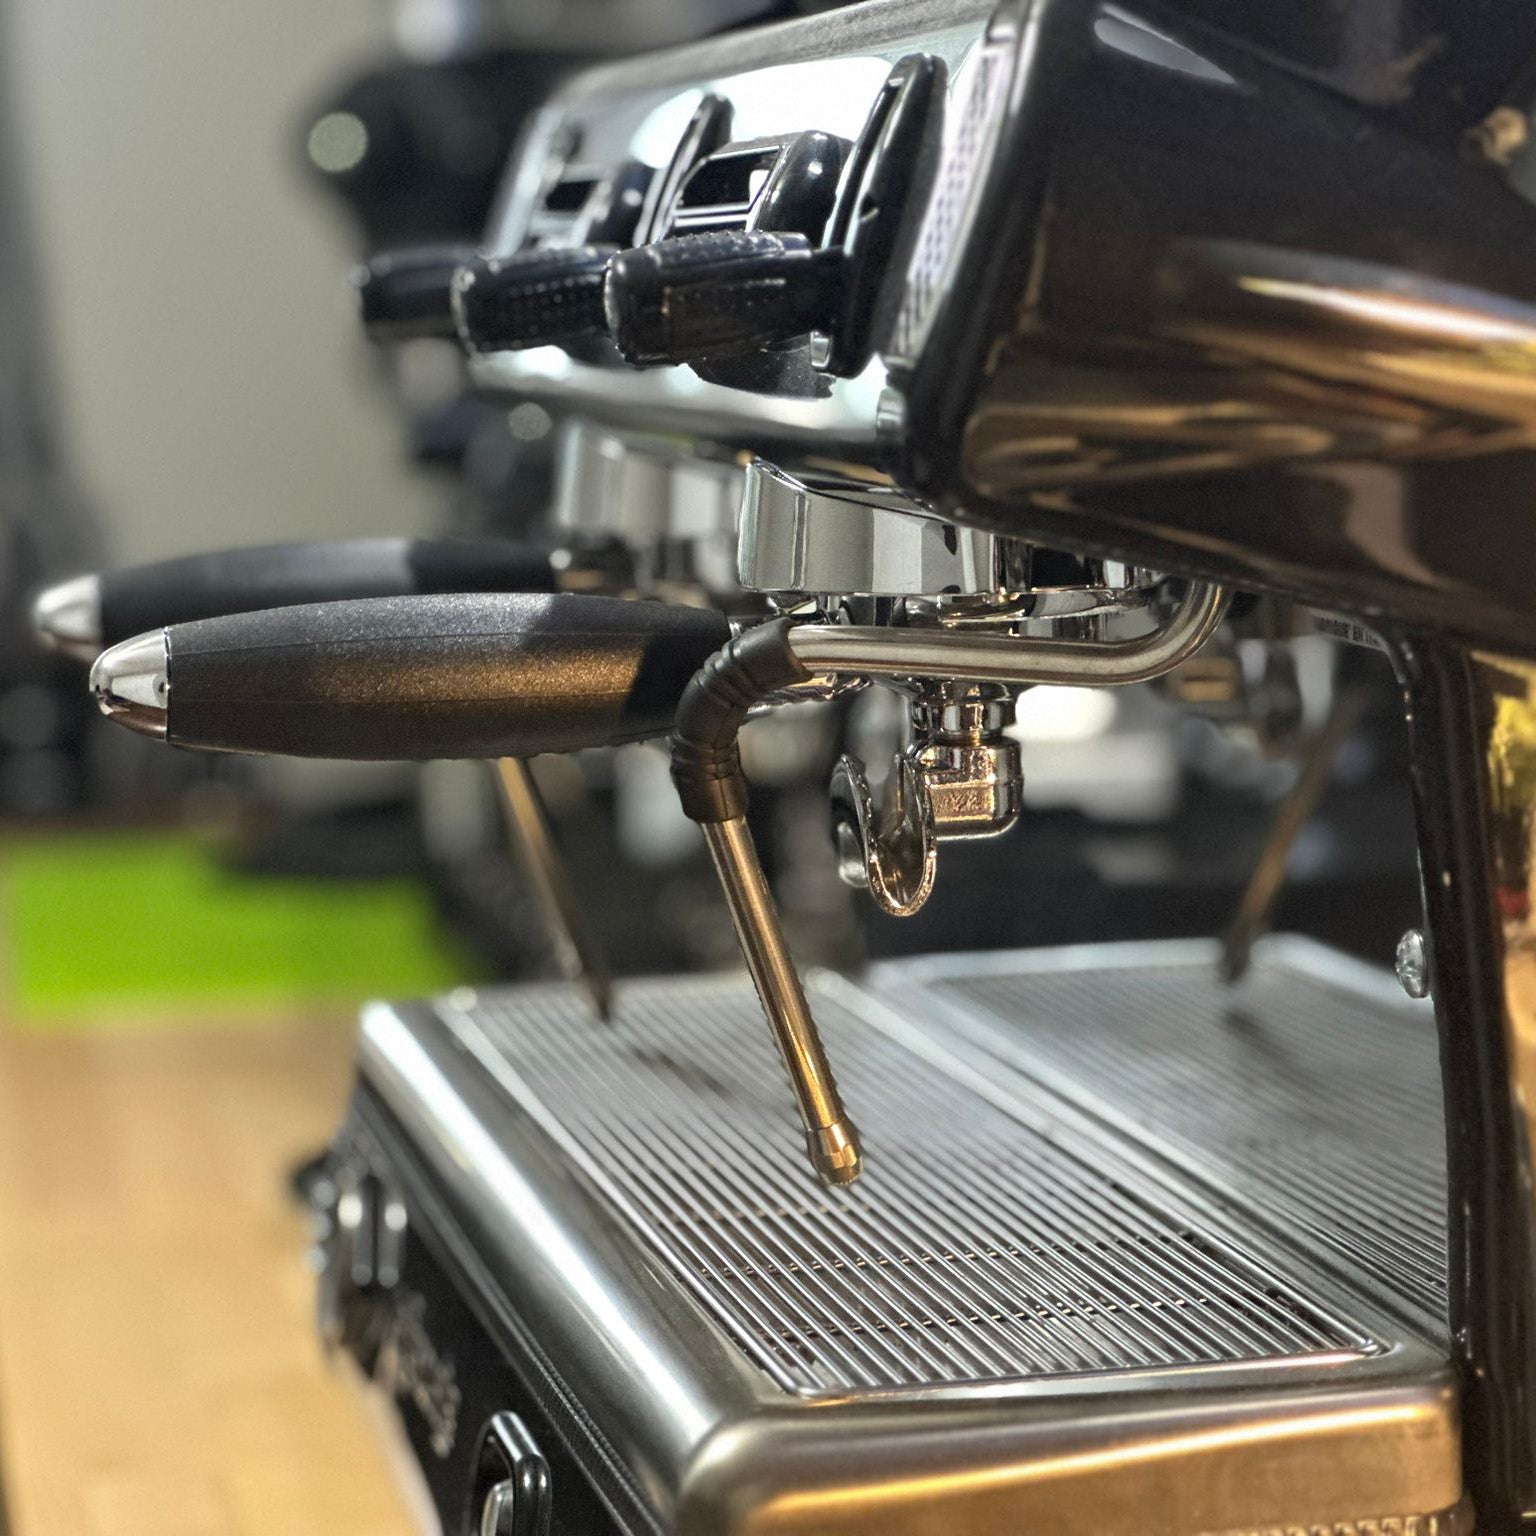
The Classika lives up to its name with classic E61 styling including polished stainless body, and a chrome plated grouphead prominently displayed on the front of the machine. A brew pressure gauge, indication lights, switches, PID controller, and a large but attractive ECM badge. The Classika is a narrower prosumer machine making it ideal for small kitchens, or for people that don't want a huge espresso machine on their counter. It isn’t much smaller than other variants, but will definitely save some space.
The Classika is a nice value, opening the box I found a double spouted portafilter, cleaning brush, a plastic tamper, single and double shot baskets, a blind filter for back flushing, and a few misc things like a manual. The portafilter is really something else, it is a heavy and nicely machined piece of gear. The handle itself is elegant unlike some of the plastic handles that many of ECM's competitors use. ECM also has an angled handle on most of their portafilters. When sitting on the counter it sits almost perfectly level without a stand. Many machines now days come with two portafilters, this setup only comes with one, but I am going to say you rarely need a single spout, I wish companies would start supplying a bottomless portafilter with every machine.


Notice how the filter is almost parallel to the counter top when at rest.

Like I said before, the Classika is a bit narrower than some similarly designed brands. It fits nicely under my cabinets. On this model to fill the water tank, the entire top of the machine is removed to gain access to the water reservoir. I liked this feature because there was no need to remove all the cups like on the Rocket machines that I am more accustomed to. The heat from the boiler warms the cups in the cup tray. Don't expect your cups to be piping hot right away, but if left on for an hour or so, they will be warm and ready to use. Id recommend heating with some hot water from the group head or steam wand.

For those not familiar with the E61 grouphead, the grouphead has tubes that run through it to allow heated water from the boiler to circulate, via siphon, through the machine to keep the grouphead nice and hot. This style of grouphead also has a 3-way valve which allows the pressure inside of the basket to be released after the shot is pulled allowing you to immediately remove the portafilter from the grouphead. Classic Italian styling, and my favorite style of espresso machine!

A view of behind the group head. The two copper pipes supply water from your boiler during brewing, but also allows the hot water to siphon through the group head to keep it hot. Thus the return piping.

The water reservoir itself is very nice and easy to fill. On mine it sits a bit unlevel. You won’t see it except when filling, so not sure it matters. The nipple on the bottom of the tank is stainless steel and plugs into the machine nicely. On this machine the low water level is controlled with a floating disk inside the reservoir. I prefer the floating disk as opposed to what many brands use which is a small conductance probe in the bottom. The issue with those probes is that if your water is too clean, the water does not conduct electricity. The sensor on the ECM appears to be a simple and reliable solution.
Below - Water tank check valve

Personal opinion, they could have made the water reservoir a bit bigger as there is some room on the sides. While you have the lid off there is a flat head screw sticking out the top. This is to adjust the over pressure valve. Easy access and a nice touch.


ECM Classika Water Sensor from Barrett on Vimeo.
Below, the black sensor is kind of like the magnetic sensor used on security systems for your house. On a security system, when you open the door it sets off the alarm. Here when the water gets to low, it does not allow the machine to run. One thing I didn't care for on this machine is that when the water runs out, the entire machine was turning off. On some other brands the power indication light blinks.

The drip tray on this thing is huge compared to others that I am used to. It is a smaller machine but the drip tray can probably hold twice as much water. My personal routine I purge the group head into the tray before and after the shot, so having the extra room is really nice. The drip tray is also deeper than some (distance in front of the machine where your cup goes) which makes it nice for people that like to use a scale to weigh their shots.


There are two toggle switches on the upper right corner of the machine. One switch is to turn on the pump. The other switch is to switch between steam and hot water on the steam wand. Many of the larger machines have a dedicated steam knob and a dedicated hot water knob. This space saving design allows the steam wand to be used for both. This might get annoying if you plan to switch back and fourth a lot. I would say that most people will only use for steaming milk. I will also note that switching back and fourth requires some extra time, and purging the water out of the wand before using for steam.

ECM Classika II PID - Steam & Hot Water from Barrett on Vimeo.
The PID display is prominently displayed on the front of the machine. Some brands hide the PID because once its set you rarely need to adjust it. A pro for having on the front in plain sight is that you are able to see the temperature and know when your machine is hot. This leads to my favorite feature, the PID display doubles as a shot timer. As soon as you start the pump, the display starts counting. Turn the pump off and it switches back to temperature.

Below is a video of the shot timer in action
ECM Classika - Shot Timer from Barrett on Vimeo.
Below is a video on how to set the temperature on the PID
ECM Classika - Setting PID Temperature from Barrett on Vimeo.
Going back to a PID vs a pressurestat let me explain the differences. The traditional older style espresso machine uses a pressurestat. When the pressure is low the switch turns the boiler on, once it has reached the desired pressure the switch turns off. It is a mechanical switch with a spring that will cycle on and off as the boiler heats and cools down. They are reliable but can cause some reliability issues as they age. The temperature swing with a pressurestat is usually a couple degrees Celsius. How is a PID different? A PID (proportional integral derivative) is a small electronic based device that uses a temperature probe that is directly coupled to the boiler. The PID has a display where you set your desired temperature. When the temperature is low, it sends a signal to turn the boiler on. Once the temp is reached, the boiler turns off. The upside? Very minimal temperature swings as the temperature probe is very accurate. There are no mechanical parts to wear out. PID’s have been used for years in many industrial industries for everything from turning fans on and off, to regulating wine/beer fermenters, and so on. The possibilities for use are endless, it's basically a digital thermostat for your espresso machine.

The solid state relay (SSD) uses a lower current signal from the PID display to turn on the high current heating element. There are no moving parts to break over time, so it can cycle on and off much more frequently to maintain the perfect temperature.

Temperature sensor going to the PID mounted on top of the boiler

Overall this is a nice machine. It has been pulling amazing shots since day one. A great value machine to get you into the prosumer market. At approximately $1450 it has everything you need to get started minus a quality espresso grinder. That being said I would recommend buying a real tamper, bottomless portafilter, and knock box if you really want to round out your new setup nicely.
https://www.espressooutlet.net/ecm-germany-classika-pid-espresso-machine-tank-reservoir/
Likes:
- The PID for temperature control.
- The PID model uses the PID display as a shot timer! Very cool feature
- The drip tray is very big for such a small machine.
- A great size, its still a large espresso machine, but narrower than many. Great when you do not want a massive espresso machine.
Indifferent or user preference:
- The steam wand can be used for steam or hot water. Personal preference I like having a dedicated arm for each.
- Sometimes the PID is hidden on certain machines, this is out front. You should rarely if ever need to change the temp once set for your altitude, but having it out front is nice for the shot timer.
- No option for direct plumb on this model
- I almost put under a like, but I could see some people not liking. On competitors machines that use reservoir tanks for fresh water, there is a door to lift off to fill the water tank. On the ECM the entire top lifts off. For me, with only a few cups on the warming tray its a pro as I don't have to take all the cups off the top of my machine, I simply take the entire tray off.
Dislikes:
- The water reservoir sits in the machine kind of crooked. Doesn’t change any of the function but seems like they could have designed better. The upside is the valve for the box is brass and works well.
- Steam seems wet
- Switching between hot water and steam seems slow
ECM Classika II PID - Overall Look from Barrett on Vimeo.
BONUS - Views on the workbench:
I like taking a look inside these machines, so let's take a look at some of the inner workings of the machine below.
Below: a view of the left side of the machine. At the bottom left, the black plate with white hose fitting is the fresh water supply for the vibration pump.

Below: the black box in the center is the machines main control board. The silver plate to the right of it is the solid state relay for the boiler.

Below: a back side view of the machine with the water reservoir tray removed. You can see the solid state relay on the bottom left, the pump bottom right. The boiler is insulated with a velcro blanket.

Below: a picture of the boiler with he insulation pulled back.

Below: on the bottom of the machine there is a small plate that can be removed. Remove the plate to gain access to the heating element. Hopefully you never need to replace, but it is easily accessible without even needing to remove the outer body of the machine.

Below: a view of the body removed with he water tank in place.

Below: similar view as above but with the water tank removed. The black sensor in the lower right corner is a magnetic sensor to sense when the water level is too low and shuts off the machine.